
Today, I’ll explain the final step of the installing kubernetes dashboard. You
can control the pods and nodes using the kubectl in the terminal. However
you must query the name with hash code and retype that name to manipulate pods
or nodes. This is a bit inconvenient with typing fault or tiring from lots of
key typing. Kubernetes dashboard is very helpful interface to control and
monitoring pods. You can see detail settings, status, and event messages.
- Creating Self-Signed Certification for Local HTTPS Environment
- Installing Ingress-Nginx on the Private Network
- Install and Access Kubernetes Dashboard
Install Kubernetes Dashboard
Through all of my post, I always download YAML files before install a pods and assign registry address to the image address.
wget https://raw.githubusercontent.com/kubernetes/dashboard/master/aio/deploy/recommended.yaml;
The metrics-scraper of the default YAML file has some x86_64 binaries, and it raises some errors on the Raspberry Pi. So that, you should change the image tag (metrics-scraper’s version) to v1.0.2.
--- k8s-dashboard-origin.yaml 2019-12-30 00:21:50.261535225 +0900
+++ k8s-dashboard.yaml 2019-12-30 00:21:31.909853184 +0900
@@ -187,7 +187,7 @@
     spec:
       containers:
         - name: kubernetes-dashboard
-          image: kubernetesui/dashboard:v2.0.0-beta8
+          image: docker.io/kubernetesui/dashboard:v2.0.0-beta8
           imagePullPolicy: Always
           ports:
             - containerPort: 8443
@@ -271,7 +271,7 @@
     spec:
       containers:
         - name: dashboard-metrics-scraper
-          image: kubernetesui/metrics-scraper:v1.0.1
+          image: docker.io/kubernetesui/metrics-scraper:v1.0.2
           ports:
             - containerPort: 8000
               protocol: TCP
After change the YAML file, apply that to install dashboard.
Connect the dashboard to the ingress
Next we apply the Ingress spec to connect dashboard through the Ingress. Many
latest browsers doesn’t support the HTTP(80) connection to a site because of the
HSTS. So, we apply the certification file as a secret in the
kubernetes-dashboard namespace for the HTTPS(443) access. While apply the
ingress spec, we will add the secret information at the ingress spec file. In
this post, I use the secret name as tls-dashboard.
kubectl -n kubernetes-dashboard create secret tls tls-dashboard --key {key file} --cert {cert file};
Now, we prepare the Ingress spec file to connect the dash board with ingress service. Following option values should be set in the metadata or spec info.
metadata.annotation.'nginx.ingress.kubernetes.io/backend-protocol': "HTTPS"Kubernetes dashboard uses HTTPS as default, so add the backend-protocol options for the ingress communicates with the dashboard.spec.tls.secretName: tls-dashboardAssign the secret information for HTTPS certification.spec.rules.http.paths.path: /Assign root path of dashboard. Using the url path shows connection fail in my environment. So, I use a specific domain name to classify the services, and use root path for each sub-domain.spec.rules.http.pashs.path.backend.servicePort: 443Use the 443 port for HTTPS.
apiVersion: extensions/v1beta1
kind: Ingress
metadata:
  name: kubernetes-dashboard-ingress
  namespace: kubernetes-dashboard
  annotations:
    kubernetes.io/ingress.class: nginx
    nginx.ingress.kubernetes.io/backend-protocol: "HTTPS"
spec:
  tls:
  - hosts:
    - "{domain}"
    secretName: tls-dashboard
  rules:
  - host: "{domain}"
    http:
      paths:
      - path: /
        backend:
          serviceName: kubernetes-dashboard
          servicePort: 443
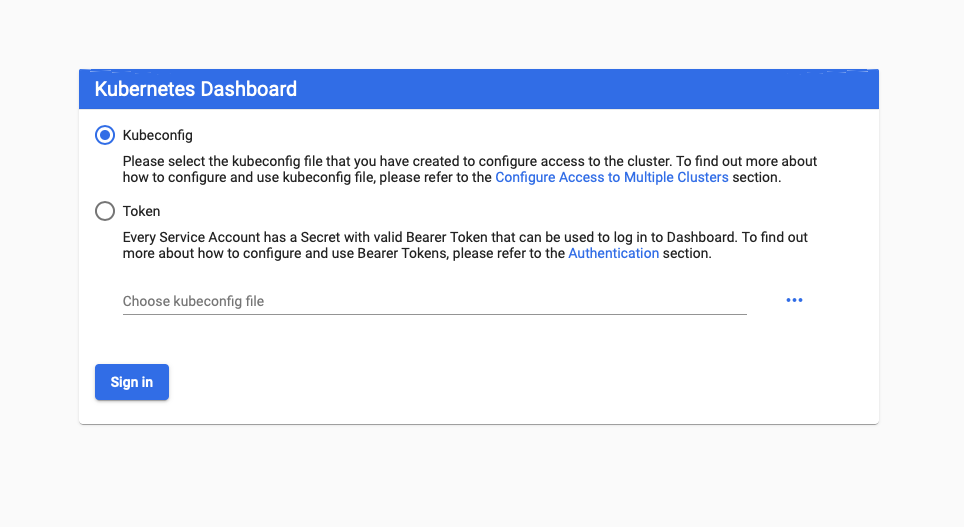
Store this spec file ans apply to the dashboard. Now we can connect the dashboard through the host’s domain address and you can see following login interface.
Create Sample Account
Now we should create user account and assign role to login the dashboard. Please read the recommended article and create sample account.
https://github.com/kubernetes/dashboard/blob/master/docs/user/access-control/creating-sample-user.md
Create service account
First, make following the service account YAML file and apply it to make user
admin-user for kubernetes-dashboard.
apiVersion: v1
kind: ServiceAccount
metadata:
  name: admin-user
  namespace: kubernetes-dashboard
Create ClusterRoldBinding
To control the cluster, we assign cluster-admin role of ClusterRole to the
admin-user account. We used the kubeadm to setup the k8s, cluster-admin
role already exists in the cluster.
Before making and applying the role binding YAML, please check the version of
k8s since the apiVersion of ClusterRoleBinding resource may differ between
k8s versions. Check the article at Creating sample user.
apiVersion: rbac.authorization.k8s.io/v1
kind: ClusterRoleBinding
metadata:
  name: admin-user
roleRef:
  apiGroup: rbac.authorization.k8s.io
  kind: ClusterRole
  name: cluster-admin
subjects:
- kind: ServiceAccount
  name: admin-user
  namespace: kubernetes-dashboard
Also, apply ClusterRoleBinding resources to the cluster.
Retreaving Token
To login the k8s dashboard, we should find the token. Run following command to get the token.
kubectl -n kubernetes-dashboard describe secret $(kubectl -n kubernetes-dashboard get secret | grep admin-user | awk '{print $1}');
The kubectl should print token information like:
Name:         admin-user-token-4swzq
Namespace:    kubernetes-dashboard
Labels:       <none>
Annotations:  kubernetes.io/service-account.name: admin-user
              kubernetes.io/service-account.uid: 51194f0a-133e-4120-9413-603dfdb67424

Type:  kubernetes.io/service-account-token

Data
====
namespace:  20 bytes
token:      eyJhbGciOiJSUzI1.......(skip long text)
ca.crt:     1025 bytes
Copy the very long token’s value and paste that on the login screan.