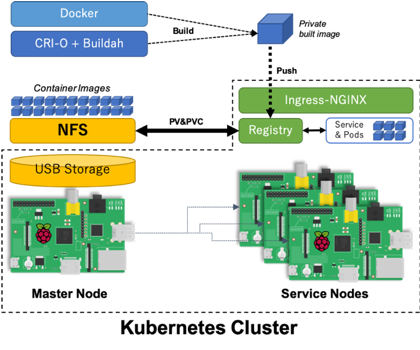
To run your services and pods, you need to build and upload the container images on the registry service. However, many public registry services charge fees for use, so that we need to build the private registry service for a personal and temporary uses.
To build the private registry service, I’ll explain setting up the NFS on Ubuntu system in this post. You can run the deploy YAML file simply, but I use the NFS servise for the PV (Persistent Volume) to keep the registered images permanently. Following image is my private registry service environment.

And, following contents will be posted.
- How to Setup the NFS on Ubuntu
- Build the Private Registry with the NFS Volume
- How to Build Container with Buildah
Format and mount the large USB storage
First of all, we should prepare and format the large size USB memory to the
EXT4 filesystem. Maybe, we can find the /dev/sda1 block device as that USB
memory. Also, add label to the USB device with nfs to mount easily.
After formatting and labelling, mount the partition of the USB at the
/vol/nfs directory.
# Format partition and assign label.
sudo mkfs.ext4 /dev/sda1;
sudo e2label /dev/sda1 nfs;

# Mount USB device to /vol/nfs
sudo mount LABEL=nfs /vol/nfs;

# Add fstab entry for automatic mounting
sudo su - c "echo LABEL=nfs /vol/nfs ext4 defaults 0 2 >> /etc/fstab";
Install and Setup the NFS
Now we install the NFS server using apt and enable the nfs server daemon.
sudo apt update;
sudo apt install -y nfs-kernel-server;

sudo systemctl enable nfs-kernel-server;
sudo systemctl start nfs-kernel-server;
To export the specific directory through the NFS, make a directory on the
/vol/nfs already mounted, and change the owner ship to nobody:nogroup.
In this post, we use /vol/nfs/registry directory for the private container
registry.
sudo mkdir -p /vol/nfs/registry;
sudo chown nobody:nogroup /vol/nfs/registry;
sudo chmod 0777 /vol/nfs/registry;
And add an access control entry at the /etc/exports. The entry has some
formats to manage the access control.
{path to share} {client ip}(rw,sync,no_subtree_check)
{path to share} {subnet IP/mask width}(rw,sync,no_subtree_check)
{path to share} *(rw,sync,no_subtree_check)
I used the second format, since I want access that registry directory from any client or compute node in my subnet. Also you can see some permission options. Each permissions mean that the clients can perform:
- rw: read and write operation
- sync: write any change to the storage before applying it
- no_subtree_check: prevent subtree checking
/vol/nfs/registry 10.0.1.0/24(rw,sync,no_subtree_check)
For the more options, please visit exports(5) - Linux man page site.
After store the /etc/export config file, run following commands to export.
sudo exportfs -a;

# Apply export configuration take effect
sudo systemctl restart nfs-kernel-server;
Apply nfs client on all servers
Before apply registry you must install nfs-common to mount nfs volume to the
registry pods. Without nfs-common, my Raspberry Pi 4 clusters cannot start
and pending on the state of ContainerCreating.
sudo apt install -y nfs-common;
